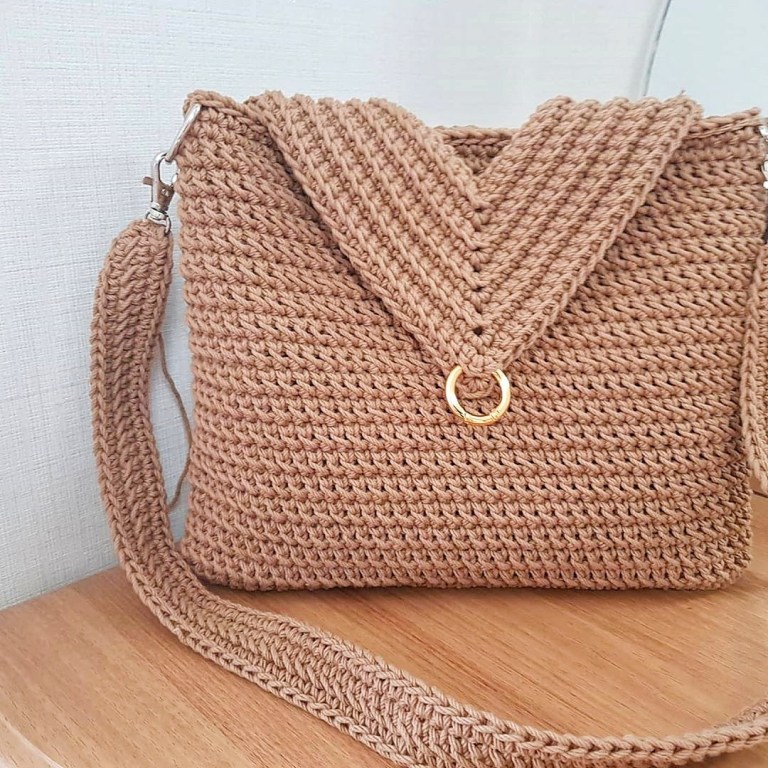
I love Great Bandoulière bags or Cross bags, they’re great to go to grocery store, parents meetings, and almost everywhere ! that’s why today i’m sharing with you this Crossbody Crochet bag pattern made by a creative designer from south corea, you can visit her Youtube channel Here .

I love also the way that this projects doesn’t look easy handmade thing, it’s chic and delicate … i don’t know but this crossbody bag looks great, it fits the requirements perfectly, with beautiful gold accessory, Perfect combination…isn’t it ?
The Design :
Made with a simple stitch : Modified DC, where you should pic in the same st then in the next st then work you DC as you always do . i’ll explain that with détails further in this pattern.
This stitch creates a simple lovely texture made and especially with Cotton 24 ply, it makes it a quick projects for holiday’s gifts.
Quick Notes :
In this Blog post you will get the free pattern of the crossbody crochet bag, along with a full Video tutorial made by Daya Hand , showing the steps for visual learners , i hope that this will help you to create this beauty !
What you’ll need :
- 3 skeins of Cotton 24 Ply 200 g
- 4 mm Crochet Hook
- 2 D rings
- Stitch marker
- Yarn needle with large eye
Finished Measurments :
- 4 cm width
- 27 cm tall
- 21 cm length
Important Notes :
- This bag is worked starting at the base which is an oval, then worked upword in the continuous round
- The stitch that we will be using is a modified DC as i mentioned before that should be worked as follow :
- Insert you hook in the same space, grab the yarn, then insert your hook in the next stitch, yarn over, pull up through 2 (like a sl st) , yarn over again, then pull up through the last 2 loops.
Crossbody Crochet Bag Pattern
Base :
- Chain 36 .
- R1 : 1 hdc in the 2nd stitch from the hook and in each of the following stitches, 4 hdc in the last st.
- don’t turn, 1 hdc in each of the opposite side stitches worked at the beginning of R1, 3 hdc in the last stitch, 1 sl st with the first stitch.
- R2 : ch 1, 2 hdc in the first stitch (we will work in rounds, do not turn your work), 1 hdc in the following stitches.
- 2 hdc in each of the 4 stitches marked in bold above,
- 1 hdc in each of the following stitches.
- 2 hdc in each of the last 3 stitches, 1 sl st.
Height :
- R3: ch 1 , 1 sc ,*insert the hook in the same stitch, and in the next stitch, bring back the yarn from , 1 YO,sl st 2 loops, 1 YO, work the 2 last loops *. repeat all around the base .
- For the next row, skip the very beginning stitch and repeat what is between ** in the next stitch (you can use a marker to help you find this first stitch to mark rounds)
- Repeat R3 17 times
- R18 : 1 sc in each stitch.
The top :
We will attach the rings:
Place the first ring in the left or right side according to your choice.
- R19: 5 sc in the ring, continue the row in sc as in R18, on the other side attach the 2nd ring, and work 5 sc in this last ring to attach it, (see min 11:00)
Finish the row in sc, 1 sl st with the first stitch. Fasten off.
The Cover:
Chain 26.
- R1 : 1 sc in the 2nd crochet stitch and in the 11 following stitches, 3 sc in the following stitch, 1 sc in each of the remaining stitches (11 stitches), 1 ml, turn.
- R2 – R10: working BLO, repeat R1, work the 3 sc in the middle stitch (2nd of 3)

Assembly :
- The designer had chosen to join by sl st the edges of the cover with the pouch.
- You can just sew using your wool needle.
- You can see the assembly from minute 19:57
The Strap :
- Start with a 65 cm chain ( or any length you prefer)
- 1 dc in the 3rd stitch counting the hook, 1 special dc in each of the following stitches
- Special dc = don’t YO at the beginning, insert the crochet in the front strand of the first (vertical) stitch of the dc, then you stitch directly in the next stitch of the chain, 1 YO, and you work the normal bridle.
- ch 2, 1 sl st in the first stitch of the row, 1 sc in each stitch of the row, in the last st place the clasp and make 3 sts inside its ring, 1 sc in the following stitches.
- Then place the second clasp in the other end and do the same 3 sc to secure it, end the row with 1 sl st in the next stitch.
That’s it! You have a new stylish crossbody crochet bag 😀
I want to thank you so much for your support and encouragement.
Don’t forget to check other free patterns on the blog like this beautiful shawl and more ! See you soon for a new pattern!


Comments 7